There are several basic parts to audio mixers. The main thing to remember with audio mixers is that one channel can do the same thing as most of the other channels. So if your working with an audio mixer that has only four channels, and you have one that has eight and you want to use it instead, all you have to remember is that one channel on either mixer can do the same thing as all other channels. There is also a pathway that sound travels through an audio mixer. It goes like this:
1. First sound enters the audio mixer through an input.
2. It then travels from the input into the channel assigned. In the channel the audio signal can be changed using several different types of devices, which I will explain in a moment.
3. From the channel, the signal travels to the master volume of the audio mixer, and then out of the audio mixer through an output.
This is the pathway that sound will travel through an audio mixer, but you have to remember that not all mixers are the same and sometimes the pathway may be a little different. Always read the manual for your equipment, and in doing so you shouldn't run into any trouble.
Now like I said, there are several different parts to a mixer, but in this article I will try to make it as basic as possible so not all parts will be explained. Just the basic ones.
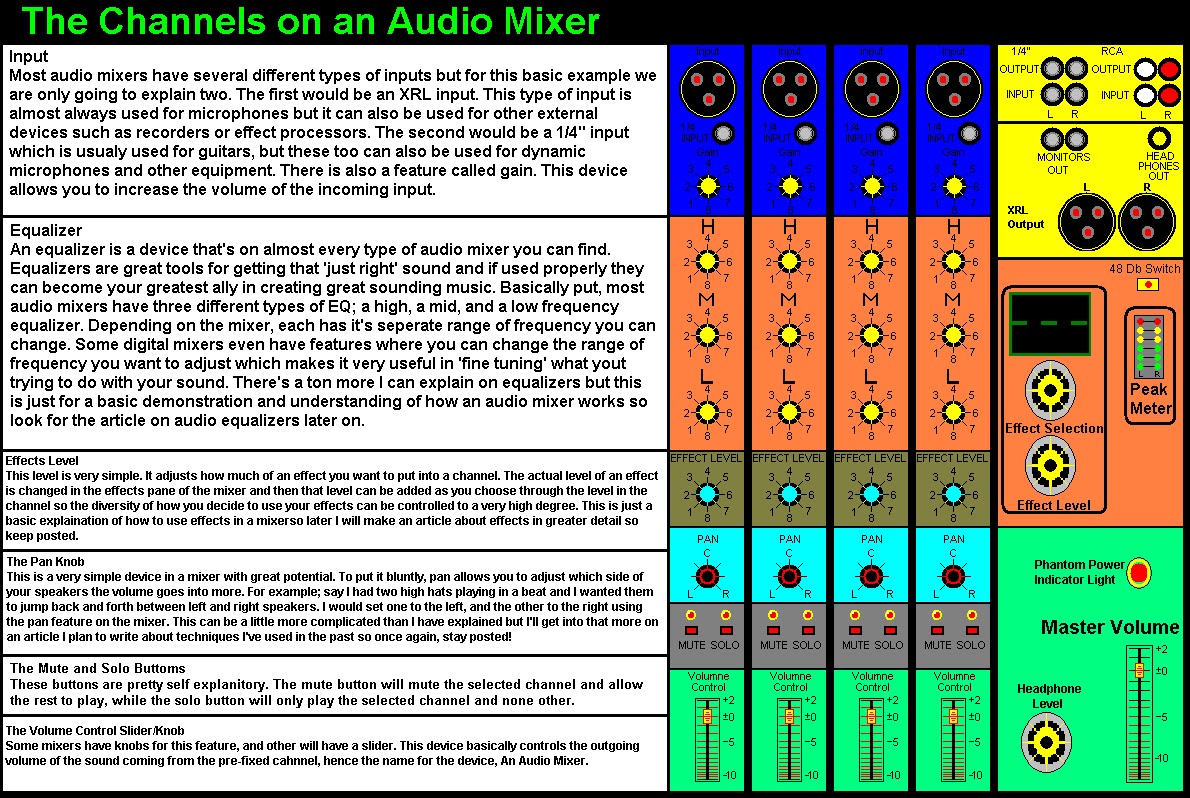
Input
Most audio mixers have several different types of inputs but for this basic example we are only going to explain two. The first will be an XRL input. This type of input is almost always used for microphones, but it can also be used for other external devices such as recorders or effect processors. The second would be a 1/4" input which is usualy used for guitars, but these too can also be used for dynamic microphones and other equipment. There is also a feature called gain. This device allows you to increase the volume of the incoming input. In addition to the different types of inputs, most audio mixers will have a small light next to the gain to let you know when the audio signal coming in exceeds the limits of the channel it is assigned to. It is usually called the 'cut' light, and it is used for getting the maximum amount of audio signal into the channel as possible.
Equalizer
An equalizer is a device that's on almost every type of audio mixer you can find. Equalizers are great tools for getting that 'just right' sound and if used properly they can become your greatest ally in creating great sounding music. Basically put, most audio mixers have three different types of EQ; a high, a mid, and a low frequency equalizer. Depending on the mixer, each has it's seperate range of frequency. Some digital mixers even have features where you can change the range of frequency you want to adjust, which makes it very useful in 'fine tuning' what your trying to do with your sound. There's a ton more I can explain on equalizers but this is just for a basic demonstration and understanding of how an audio mixer works so look for the article on audio equalizers later on.
Effects Level
This level is very simple to understand. It adjusts how much of an effect you want to put into a channel. The actual level of an effect is set in the effects pane of the mixer and then that level can be added as you choose through the level in the channel. So the diversity of how you decide to use your effects can be controlled to a very high degree. This is just a basic explanation of how to use effects in a mixer so later I will make an article about effects in greater detail, SO KEEP POSTED!
The Pan Knob
This is a very simple device in a mixer that has great potential. To put it bluntly, pan allows you to adjust which side of your speakers the sound from the channel goes into more. For example; say I had two high hats playing in a beat and I wanted them to jump back and forth between the left and right speakers. I would set one to the left, and the other to the right using the pan feature on the mixer. This can be a little more complicated than I have explained, but I'll get into that more on an article I plan to write about techniques I've used in the past so, once again, STAY POSTED!
The Mute and Solo Buttons
These buttons are pretty self explanitory. The mute button will mute the selected channel and allow the rest to play, while the solo button will only play the selected channel and none other.
The Volume Control Slider/Knob
Some mixers have knobs for this feature, and others will have a slider. This device basically controls the outgoing volume of the sound coming from the pre-fixed cahnnel, hence the name for the device, An Audio Mixer.
Below is a diagram for the things I have explained so hopefully it will add to your understanding of how things work. You may have to use crt+scroll up to magnify the picture, but i assure you the explanations are the same as above.
These are the basic controls an audio mixer will have in it's channels. Some mixers will have channels specifically for effects, or for running more than one audio signal together into one output, and these channels will lack in the different things you can do with the audio signal. Now there is more to an audio mixer than just what I've explained already. Actually there is a whole lot more but this article is for simple understanding only.
Now for the other parts of the mixer. The devices I'm about to explain pertain to the output of the audio mixer and also to it's devices in the channels that were not explained above.
Outputs
There are several different types of outputs that can be found on a mixer. The most common ones are a 1/4" jack, an RCA, a monitor, XRL, and headphone outputs. The amount and the different types of outputs on an audio mixer can vary, but the ones listed and explained here are the most basic and the most common. These are all very basic explanations so if your looking for more detailed information you can find them in later articles.
The 1/4" Jack Output
This type of output, as explained before, is basically a guitar jack. Although this type of input/output is usually associated with guitars and amps, these types of inputs/outputs can have a range of many other uses. For the example here, the 1/4" output on a mixer can be used to send audio from the mixer to other equipment such as recorders, speakers, and computers. They can also be used to send the audio ouput to another type of audio processor that will allow you to change the audio in another way before it reaches the desired destination.
The RCA Output
This type of output is usually used for sending the audio out to a stereo or other form of sound output, and it can also sometimes be used in the same way as a 1/4" jack.
Monitors
A monitor output on a mixer is an output used to send the audio from the mixer into a monitor speaker system. These types of speakers are very different than the ones used for stereos and stages because they have a very wide frequency range and are used for mastering the audio production. Good monitors are an essential part of a studio since you have to have a way to determine if the sound your producing sounds good and doesn't have static in a frequency range that could hurt the over all quality of the music. On most audio mixers, the monitor ouput will have it's own level of output, but if not, it will be tied in with the master volume.
The XRL Output
This type of output is best for getting the highest quality possible from a mixer since these types of cords are usually shielded from outside static that could otherwise diminish the quality of your work. They do have their own limits though, since not all types of equipment involving production support this type of plug-in. For best quality though, I would advise going with this type of input and output.
Headphones
The headphone output is used for headphones, of course, but not just for listening to the sound going through the audio mixer. Using headphones on an audio mixer allows you to adjust the sound and fine tune things before it leaves the audio mixer, which in turn gives you better quality with your work. There is also a level for the headphones usually located near the master volume, or near the headphone input.
The Effects Pane
This feature on a mixer can have a few different things, but for this simple demonstration I am only going to use the effects and the peak meter. The effects pane on a mixer can vary from mixer to mixer, but for the most part here's how they work. You will have a digital display that gives you a number, and each number is assigned to an effect. The effect selection knob allows you to switch through effects, and the effects level knob allows you to control the amount of the effect you want to send. Each channel also has an effect level knob which allows you to fine tune the effect you want to use. For example, say we want to add a simple hall reverb to a guitar. We first run the guitar into the channel, then select the hall effect. Now say we don't want to use the full force of the ffect, only half. That is where the effect level knob in the effects pane comes into play. We would set that level at the halfway mark, and then adjust the level in the channel until we get the desired effect. For more on effects, look for my article on effects generators and processors.
The Peak Meter
This meter is a meter that will help you a lot if used properly. Most audio equipment in music production has these meters, and for good reason. When a sound travels through a channel, each channel has a certain amount of Db it can hold and then it will peak out, or "clip". When this happens, it means the sound has surpassed the limits of the channel and static will come out instead of sound. This meter here is for the overall output of the mixer, and if it hits the red at any time, it means that somehwere in your setup a channel or level has peaked over the mixer's limits and needs to be tuned down.
The Master Volume Level/Slider
This is pretty self explanitory since it controls the master level of output from the mixer. The only volumes it won't control is the monitor volume and the headphone volume. Those two will have their own levels.
Like the above explanations, below is a diagram with the same explanations for better understand a mixer. It is very similar to the one above, but the explanations contained are the ones that I just explained. Again, if you want you can use crtl+scroll up to magnify the picture.

Audio mixers are very simple as I've already said, but sometimes people just don't get how to use them properly. Later I will add articles explaining different techniques that will help you get the most out of their use. For now, I hope that I've covered enough basics for you to be able to use an audio mixer, and later I will revise this article with a little more information. Maybe I'll even make it a little more organized, if possible, so you can understand things better. If you have any questions about audio mixers on how to use them or what a specific function does, just email me. You can find my email in the contact tab at the top of this webpage. Thanks for viewing and I hope you come back for more knowledge on music production.
- Tha_Martian
No comments:
Post a Comment